Sim Challenge 2: The Lowdown (IFR)
Sim Challenge 2: The Lowdown (IFR)
A short winter flight in Vermont from Rutland (KRUT) to Burlington (KBTV) packs in an IFR procedures workout. It’s also a first-hand look at what cold temperatures can do to your altimeter (and what to do about it).
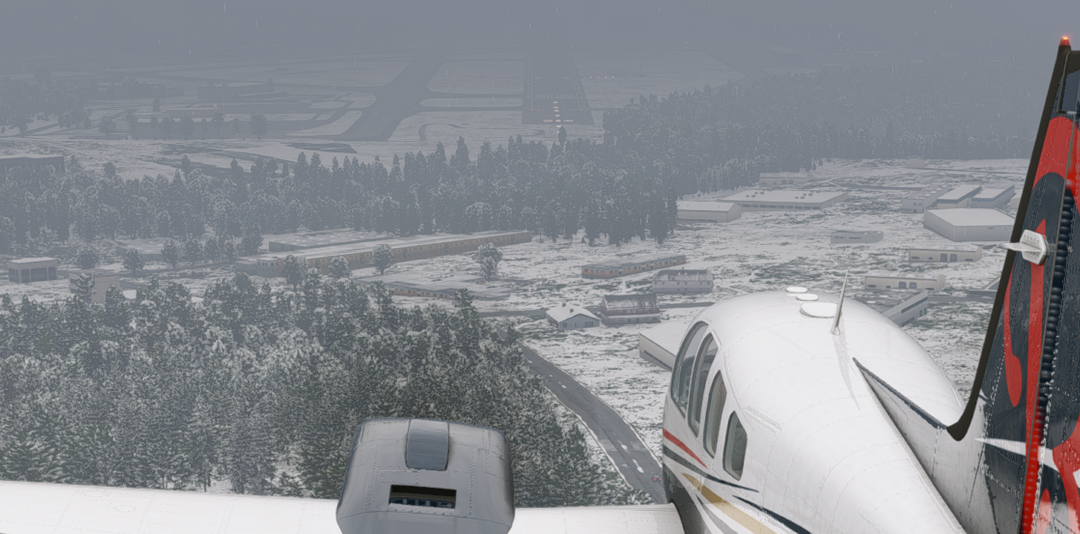
The short hop from Burlington to Rutland in your Baron earlier in the week was a perfect winter day to fly with severe clear and smooth air. After a few great days on the slopes at Killington, you had just begun to think about the return trip when New England did what New England does in the winter.
Overnight, a winter system had moved through and you woke to find Rutland socked in with low ceilings and snow showers. By late afternoon the snow had tapered off, but conditions remained stubbornly IFR, and the forecast is calling for another round moving in tonight. You would strongly prefer to avoid being stuck here for waiting for a window and it’s only 57 miles to get home to Burlington. How hard could it be?
Time to Fly: ~30 minutes
Aircraft Used: Any high-performance, IFR-certified, FIKI-equipped aircraft (Beech Baron, Cirrus SR22, etc.)
Tasks:
- Depart Rutland and climb to 6000
- Reposition near Burlington
- Fly the KBTV ILS RWY 33 without temperature corrections
- Reposition to do it again
- Fly the KBTV ILS RWY 33 with temperature corrections
Skills Practiced:
- Parsing a non-towered IFR clearance and release
- Flying a complex routed departure procedure
- Applying cold temperature altitude corrections
Prepare an Altitude Comparison Table
To see how inaccurate your altimeter can be without cold temperature corrections, you’ll fly the same ILS approach twice during this Sim Challenge: once without cold temperature corrections, then once with them. As you fly each approach, you’ll record both your indicated altitude and real MSL altitude as you cross the intermediate segment fixes and the PFAF (Precision Final Approach Fix, a.k.a. glideslope intercept). Get a piece of paper and make the following table so you’ll have it available as you fly:
| Fix | Published Altitude | Approach 1 Indicated Altitude | Approach 1 MSL Altitude | Approach 2 Indicated Altitude | Approach 2 MSL Altitude |
|---|---|---|---|---|---|
| NIDUQ | 5400′ | ||||
| HONIB | 4700′ | ||||
| EHIKO (PFAF) | 3800′ |
Note: To find and record your real MSL altitude as you cross each fix, you can connect your EFB to the simulator and watch the “GPS Altitude” on the instruments display. Or, pull up the in-simulator map and note the MSL altitude for your aircraft.
Note 2: This challenge is best done with X-Plane rather than Microsoft Flight Simulator, as the latter doesn’t simulate temperature errors. You can still use MSFS if it’s all you have, but you’ll have to take our word for the errors.
Brief the Flight
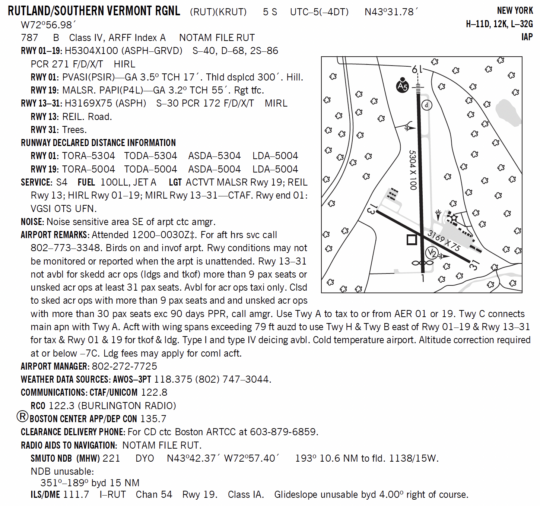
KRUT Chart Supplement
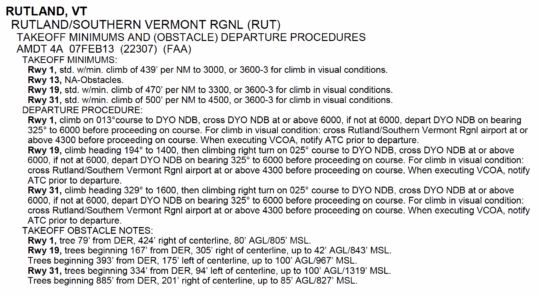
KRUT Takeoff Minimums & ODP
KRUT METAR
KRUT 161611Z AUTO 34004KT 2SM -SN OVC008 M20/M22 A3018 RMK A02
KBTV ATIS
“Burlington Airport Information Bravo, time 1555Z. Wind 360 at 4, visibility 2 statute miles, light snow, ceiling 800 overcast, temperature -20°C, dewpoint -22°C, altimeter 30.18. ILS Runway 33 in use. Remarks: Braking action advisories are in effect. Advise you have information Bravo.”
NOTAMS
RUT RWY 19 FICON 5/5/5 10 PCT 1/8IN SLUSH AND 90 PCT WET, 10 PCT 1/8IN SLUSH AND 90 PCT WET, 20 PCT 1/8IN SLUSH AND 80 PCT WET DEICED LIQUID AND DEICED SOLID OBS AT 1543.
RUT APRON PATCHY COMPACTED SN 3FT SNOWBANKS BA GOOD TO MEDIUM OBS AT 1522.
RUT OBST HILL (ASN UNKNOWN) 432756N0725557W (4NM S RUT) 2230FT NOT LGTD. 04 JAN 17:55 2022 UNTIL PERM
BTV RWY 33 FICON 5/5/5 10 PCT COMPACTED SN AND 20 PCT 1/8IN DRY SN DEICED SOLID 75FT WID OBS AT 1545.
BTV AP ALL SFC WIP SNOW REMOVAL
BTV RWY 01/19 CLSD
BTV TWY A BTN TWY B AND TWY C CLSD
Your Clearance
“Cleared to the Burlington airport via DYO GRNMT then direct. After departure, climb and maintain 6000. Departure frequency is Boston Center on 135.7, squawk 4521. Hold for release.”
| CONFIGURE THE SIMULATOR |
| Position: Rutland–Southern Vermont Regional (KRUT), holding short of Runway 19.
Time: 1608Z (late morning local) Weather Settings:
Note: -20°C is pretty cold even for Vermont, but it’s not record-breaking either (maybe a few days each winter). The altimeter error scales with temperature, so this makes the effect clearer. |
Depart from Rutland
Clearance copied and runup complete, you’re holding short of Runway 19.
Call Boston Center for your IFR release.
You: “Boston Center, N12345, number one for departure Runway 19 at Rutland.”
Center: “N12345, you’re released for departure. Clearance void if not off by 1605 Zulu. Time now 1608.”
Take off and contact Boston Center.
You: “Boston Center, N12345, off Rutland, climbing to 6000.”
Center: “N12345, radar contact. Climb and maintain 6000.”
You climb into the clouds, with some light rime accumulating.
Level off when you reach 6000′ MSL.
| PAUSE THE SIMULATOR WHEN LEVEL AT 6000′ |
Departure Debrief
Question 1: How did you obtain your IFR clearance at Rutland?
Since Rutland has no tower, RCO, or clearance delivery frequency, you’ll need to call Boston Center directly on the old-fashioned telephone (phone number listed in the Chart Supplement under “FOR CD”). Since you got a “hold for release” clearance, you’ll have to call them back at the same number when you’re ready to go. In these cases, having a headset connected via Bluetooth to your phone comes in really handy.
Question 2: How did you fly the departure from Runway 19?
Rutland is surrounded by mountainous terrain, so the Runway 19 obstacle departure procedure (ODP) requires a steep climb of 470 ft/NM to 3300′, and a complex route that ends up over the DYO NDB.
For a Baron, the required rate of climb to achieve a 470 ft/NM climb gradient at 105 KIAS, in still air, is 105 * (470 / 60) = 823 fpm. That’s pretty sporty, but certainly doable for a Baron. However, also consider your ability to meet that required climb gradient if you were to lose an engine or to pick up an unhealthy amount of ice in the climb.
There is also a visual climb over airport (VCOA) option that exists to allow IFR departures for aircraft unable to meet the required climb gradient, but it comes with higher takeoff minimums to allow you visually avoid the obstacles that you would otherwise be avoiding with your higher climb gradient.
Unless told otherwise by ATC, IFR departures should be assumed to be flying the published departure procedure. However it never hurts to mention your intentions to ATC to ensure everyone is on the same page.
Question 3: Decode the FICON for your departure runway.
The RUT RWY 19 FICON reads:
5/5/5 10 PCT 1/8IN SLUSH AND 90 PCT WET, 10 PCT 1/8IN SLUSH AND 90 PCT WET, 20 PCT 1/8IN SLUSH AND 80 PCT WET DEICED LIQUID AND DEICED SOLID OBS AT 1543.
What does this tell you about Runway 19?
The “5/5/5” indicate the Runway Condition Codes for each third of the runway (touchdown, midpoint, rollout), which correlate to expected braking action. The scale runs from 6 (dry) down to 0 (ice rink).
| RwyCC | Braking Action |
|---|---|
| 6 | Dry |
| 5 | Good |
| 4 | Good to Medium |
| 3 | Medium |
| 2 | Medium to Poor |
| 1 | Poor |
| 0 | NIL |
The details on contamination follow the condition codes and are also reported for each third of the runway, and at Rutland it shows that the first two thirds have slightly better conditions than the rest of the runway. Despite the contamination, the condition codes still indicate good braking for the entire runway. Remember to pay attention to the time of the FICON observation because when winter weather is moving through, actual conditions can change rapidly, so caveat aviator. In our case the observation was at 1543Z, or about a half hour before our flight.
Brief the Approach
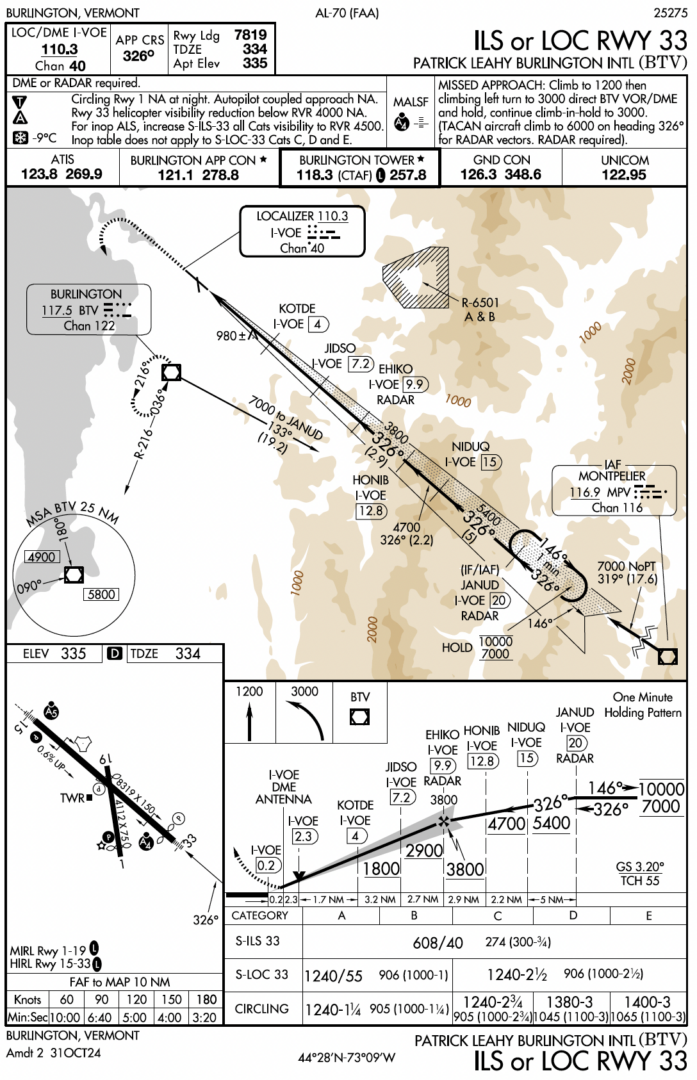
KBTV ILS or LOC RWY 33
| RECONFIGURE THE SIMULATOR |
| Position: Outside JANUD intersection (the IF for the ILS 33 at KBTV), established on the localizer
Altitude: 7000′ MSL Heading: 326° Configuration: Gear up, flaps up, 140 KIAS. Load and activate the ILS 33 from JANUD without the course reversal Time: 1620Z Weather Settings: Unchanged from departure (-20°C at the surface) |
Fly the Uncorrected Approach at Burlington
You’re approaching JANUD, established on the localizer, and have been cleared for the ILS Runway 33 at Burlington.
| UN-PAUSE THE SIMULATOR |
Fly the published altitudes exactly as charted. Do NOT apply cold temperature corrections.
Note: Descend promptly and level off at each stepdown, so you’ll intercept the glideslope at the published indicated altitude.
As you cross NIDUQ, HONIB, and EHIKO, record your indicated altitude and your real MSL altitude in the table you created.
At EHIKO intercept the glideslope, fly the ILS, and land.
| PAUSE THE SIMULATOR AFTER LANDING (or after intercepting the glideslope if you’re pressed for time) |
Uncorrected Approach Debrief
Question 4: What does the snowflake symbol on the approach chart mean?
The snowflake tells you that the airport is one of the FAA’s designated Cold Temperature Restricted Airports, which have procedures that need cold temperature altimetry error corrections to ensure sufficient required obstacle clearance is applied.
The temperature next to the snowflake symbol (and published in the Chart Supplement) tells you that you (yes, you) need to calculate and apply cold temperature corrections to published approach altitudes when the reported temperature is at or below that temperature. At KBTV, the threshold temperature is -9°C, so since the temperature today is -20°C, you’ll need to correct some segment altitudes.
Which segment altitudes? That’s a good question. You need to either correct all segment altitudes inside the IAF, or look up the segments that are actually affected on the FAA’s Cold Temperature Airports list, which is updated annually and may be included as a document in your EFB. At KBTV, only the intermediate segment is shown as requiring correction.

Question 5: How did your indicated vs. MSL altitude compare?
| Fix | Published Altitude | Approach 1 Indicated Altitude | Approach 1 MSL Altitude | Cold Temp Error |
|---|---|---|---|---|
| NIDUQ | 5400′ | 5400′ | 4820′ | 580′ |
| HONIB | 4700′ | 4700′ | 4210′ | 490′ |
| EHIKO (PFAF) | 3800′ | 3800′ | 3410′ | 390′ |
Across the intermediate segment, you were 390-580 feet lower than your altimeter would lead you to believe, which could be significant.
Question 6: What did you notice about the glideslope indication?
You might have noticed that, without corrections applied, you crossed each of the intermediate fixes well below the ILS glideslope. This is because the glideslope is a radio beam transmitted at a fixed geometric angle (3.2° for the ILS 33) from the runway and is unaffected by cold temperature errors.
The issue at hand is that your altimeter is misleading you. It works by measuring barometric pressure and then converting it to an indicated altitude, which is accurate in standard conditions (ISA). While it allows you to compensate for non-standard pressure through the Kollsman window, it doesn’t allow you to compensate for non-standard temperature (15°C at sea level, decreasing by 2°C per thousand feet). When the actual temperature is colder than standard, the air is denser, causing your altimeter to read higher than your true altitude.
Let’s set things up to fly the approach again (with temperature corrections this time).
| RECONFIGURE THE SIMULATOR AGAIN |
| Position: Outside JANUD intersection (the IF for the ILS 33 at KBTV), established on the localizer
Altitude: 7000′ MSL Heading: 326° Configuration: Gear up, flaps up, 140 KIAS. Load and activate the ILS 33 from JANUD without the course reversal Time: 1620Z Weather Settings: Unchanged from departure (-20°C at the surface) |
Calculate the Cold Temperature Corrections
To apply cold temperature corrections to the intermediate segment altitudes, you’ll first have to calculate them, using the “ICAO Cold Temperature Error Table” found in the AIM.
Refer to AIM 7-3-1 “Effect of Cold Temperature on Barometric Altimeters” to see the table, and to AIM 7-3-5 “Cold Temperature Airport Procedures” for additional instructions on how to use it.
You’ll need to find the required corrections at each fix (NIDUQ, HONIB, and EHIKO):
- Calculate the “Height Above Airport” (HAA) at each fix by subtracting the airport elevation (335′ at KBTV) from the charted altitude at the fix.
- In the left column of the “ICAO Cold Temperature Error Table,” find the “Reported Temperature” (-20° C at KBTV).
- In the top row of the table, find the “Height Above Airport” that you calculated for the fix.
- Find the intersection of that “Reported Temperature” row and that “Height Above Airport” column (interpolate as needed). This number represents how far the aircraft may be below the indicated altitude due to possible cold temperature induced error.
- Round the determined correction to the nearest whole hundred (or up, if you prefer). This number represents the altitude correction you must apply crossing this fix to avoid the error caused by the cold temperature.
Using the procedure above, fill out the following table:
| Fix | Published Altitude |
HAA | Correction | Fly |
|---|---|---|---|---|
| NIDUQ | 5400′ | |||
| HONIB | 4700′ | |||
| EHIKO (PFAF) | 3800′ |
Be sure to do these calculations during a low workload phase of flight (or even better, before takeoff), since nobody wants to be interpolating tables while setting up for an approach.
We encourage you to do the calculations and fill out the table for practice. To check your work (or get flying sooner if you choose) …
Click here to see the completed table
| Fix | Published Altitude |
HAA | Correction | Fly |
|---|---|---|---|---|
| NIDUQ | 5400′ | 5065′ | +710′ | 6100′ |
| HONIB | 4700′ | 4365′ | +626′ | 5300′ |
| EHIKO (PFAF) | 3800′ | 3465′ | +495′ | 4300′ |
Fly the Corrected Approach at Burlington
Now you’ll fly it right. You’re approaching JANUD, established on the localizer, and have been cleared for the ILS Runway 33 at Burlington.
Make your cold temperature request.
You: “N12345, request 6100 at NIDUQ, 5300 at HONIB, and 4300 at EHIKO for cold temperature operations.”
Approach: “N12345, approved as requested.”
| UN-PAUSE THE SIMULATOR |
Fly the CORRECTED altitudes at each fix to account for cold temperature altimetry error.
Note: Descend promptly and level off at each stepdown at the CORRECTED indicated altitude.
As you cross NIDUQ, HONIB, and EHIKO, record your indicated altitude and your real MSL altitude in the table you created.
At EHIKO intercept the glideslope, fly the ILS, and land.
| PAUSE THE SIMULATOR AFTER LANDING |
Corrected Approach Debrief
Question 7: Compare the recorded MSL altitudes on your two approaches
| Fix | Published Altitude | Approach 1 Indicated Altitude | Approach 1 MSL Altitude | Approach 2 Indicated Altitude | Approach 2 MSL Altitude |
|---|---|---|---|---|---|
| NIDUQ | 5400′ | 5400′ | 4820′ | 6100′ | 5530′ |
| HONIB | 4700′ | 4700′ | 4210′ | 5300′ | 4810′ |
| EHIKO (PFAF) | 3800′ | 3800′ | 3410′ | 4300′ | 3910′ |
Our results show that the computed correction does a pretty good job at compensating for the altimetry error due to cold temperatures. When you fly the calculated indicated altitude that is higher than the published altitude, it positions your aircraft vertically where it would have been in a standard atmosphere.
Question 8: Why is only the intermediate segment corrected at BTV?
Every approach environment is different, and the need to correct some, all, or none of the segment altitudes depends on the history of actual observed cold temperatures at that airport, as well as the additional available margin of required obstacle clearance already built into the approach. In the case of the ILS 33 at KBTV, the intermediate segment crosses some pretty high terrain near the Camel’s Hump mountain. Considering the compounding sources of errors in flight (altimeter/system errors, differences between local temperature/pressure and the airport, etc.), the FAA makes a risk-based determination of requiring adjustments to certain segments.
Note that compensating for the effect of cold temperatures on altimeters using similar methods has been standard procedure in Canada for a long time.
Bonus Question: Why are there two temperature limits on the RNAV (GPS) Z RWY 33?
You’ve flown the ILS to Runway 33 at Burlington. Now take a look at the RNAV (GPS) Z RWY 33, paying special attention to the Notes Box in the Briefing Strip.
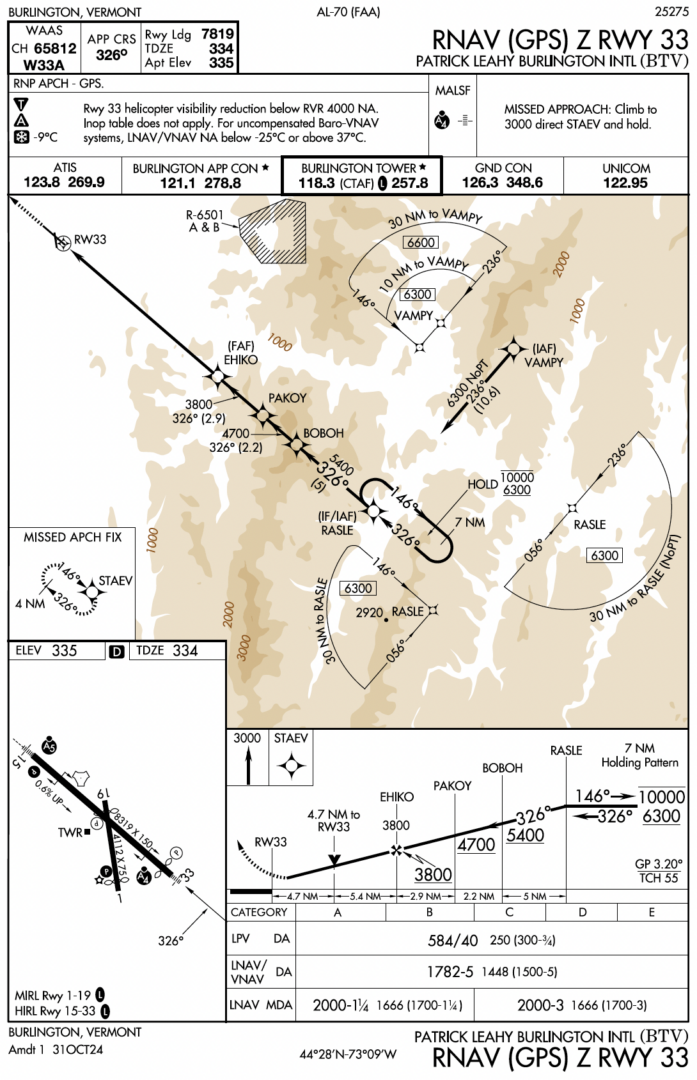
You might notice the approach has both a snowflake symbol with a -9°C threshold and a note about “uncompensated Baro-VNAV systems, LNAV/VNAV NA below -25°C or above 37°C.” These are independent restrictions intended to address different problems.
In this Sim Challenge we discussed the snowflake and the associated cold temperature corrections to segment altitudes. These correct for cold temperature altimetry errors and put you vertically at the true altitude intended by the procedure design. The Baro-VNAV limits ensure the final segment glidepath remains within limits. If you haven’t compensated for cold temperature altimetry errors, your true altitude at the PFAF will vary by temperature (lower than planned with cold temperatures, higher than planned with high temperatures). Outside of the published temperature range, the effective glidepath angle would exceed the TERPS glidepath angle limitations for the published category.
However, this is somewhat of an antiquated concept these days. For aircraft equipped with WAAS navigators, this is a non-issue since these navigators generate geometric vertical guidance internally. Many aircraft without WAAS navigators (including many airliners and business aircraft) are equipped with onboard temperature compensation. However, when flying aircraft that lack both WAAS and temperature compensation, on extremely hot or cold days, you’ll need to pay attention to those temperature limitations.
Wrap Up
After landing you slalom around snowbanks and snowplows to get your Baron back in the hangar since the next system is already starting to close in. It feels better to be here than left waiting for a window back in Rutland.
Winter flying has a knack for sneaking up on you with its unique set of skills and knowledge that sit idle for most of the year, then suddenly matter a lot. Today you got the lowdown on cold temperature altimetry errors (the kind that make you fly low … down) and how to correct them. Keep it fresh this winter, then file it away until next winter—but don’t forget where you put it.
Extra Challenges
Vary the temperature: Fly the intermediate segment at -10°C, then -30°C and watch how the MSL crossing altitude differences scale with temperature.
Follow the glideslope: Fly the intermediate segment uncorrected while following the glideslope at -20°C and compare the indicated altitude crossing the fixes inside the IF with the corrected altitudes.
Want Even More? |
| Fly another Sim Challenge
Or, check out our new interactive twist on aviation quizzes: What’s Wrong? Want to receive more scenarios like this and weekly pilot’s tips right in your inbox? Sign up here. |
